Get Started: Install on macOS
- System requirements
- Get the Flutter SDK
- Editor setup
- Platform setup
- iOS setup
- Android setup
- Next step
System requirements
To install and run Flutter, your development environment must meet these minimum requirements:
- Operating Systems: macOS (64-bit)
- Disk Space: 700 MB (does not include disk space for Xcode or Android Studio).
- Tools: Flutter depends on these command-line tools being available in your environment.
bash,mkdir,rm,git,curl,unzip,which
Get the Flutter SDK
To get Flutter, use git to clone the repository and then add the flutter tool to your path.
Running flutter doctor shows any remaining dependencies you may need to install.
Clone the repo
If this is the first time you’re installing Flutter on this machine, clone the
beta branch of the repository and then add the flutter tool to your path:
$ git clone -b beta https://github.com/flutter/flutter.git
$ export PATH=`pwd`/flutter/bin:$PATH
The above command sets your PATH variable temporarily, for the current terminal window. To permanently add Flutter to your path, see Update your path.
To update an existing version of Flutter, see Upgrading Flutter.
Run flutter doctor
Run the following command to see if there are any dependencies you need to install to complete the setup:
$ flutter doctorThis command checks your environment and displays a report to the terminal window. The Dart SDK is bundled with Flutter; it is not necessary to install Dart separately. Check the output carefully for other software you may need to install or further tasks to perform (shown in bold text).
For example:
[-] Android toolchain - develop for Android devices
    • Android SDK at /Users/obiwan/Library/Android/sdk
    ✗ Android SDK is missing command line tools; download from https://goo.gl/XxQghQ
    • Try re-installing or updating your Android SDK,
      visit https://flutter.io/setup/#android-setup for detailed instructions.
The first time you run a flutter command (such as flutter doctor), it downloads its own dependencies and compiles
itself. Subsequent runs should be much faster.
The following sections describe how to perform these tasks and finish the setup process.
You’ll see in flutter doctor output that if you choose to use an IDE, plugins
are available for IntelliJ IDEA, Android Studio, and VS Code. See Editor Setup
for the steps to install the Flutter and Dart plugins.
Once you have installed any missing dependencies, run the flutter doctor command again to
verify that you’ve set everything up correctly.
The flutter tool uses Google Analytics to anonymously report feature usage statistics
and basic crash reports. This data is used to help improve Flutter tools over time.
Analytics is not sent on the very first run or for any runs involving flutter config,
so you can opt out of analytics before any data is sent. To disable reporting,
type flutter config --no-analytics and to display the current setting, type
flutter config. See Google’s privacy policy:www.google.com/intl/en/policies/privacy.
Update your path
You can update your PATH variable for the current session only at the command line,
as shown in Clone the Flutter repo. You’ll probably want to
update this variable permanently, so you can run flutter commands in any terminal session.
The steps for modifying this variable permanently for all terminal sessions are machine-specific. Typically you add a line to a file that is executed whenever you open a new window. For example:
- Determine the directory where you placed the Flutter SDK. You will need this in Step 3.
- Open (or create)
$HOME/.bash_profile. The file path and filename might be different on your machine. - Add the following line and change
[PATH_TO_FLUTTER_GIT_DIRECTORY]to be the path where you cloned Flutter’s git repo:
$ export PATH=[PATH_TO_FLUTTER_GIT_DIRECTORY]/flutter/bin:$PATH-
Run
source $HOME/.bash_profileto refresh the current window. -
Verify that the
flutter/bindirectory is now in your PATH by running:
$ echo $PATHFor more details, see this StackExchange question.
Editor setup
Using the flutter command-line tools, you can use any editor to develop Flutter applications.
Type flutter help at a prompt to view the available tools.
We recommend using our plug-ins for a rich IDE experience supporting editing, running, and debugging Flutter apps. See Editor Setup for detailed steps.
Platform setup
macOS supports developing Flutter apps for both iOS and Android. Complete at least one of the two platform setup steps now, to be able to build and run your first Flutter app.
iOS setup
Install Xcode
To develop Flutter apps for iOS, you need a Mac with Xcode 7.2 or newer:
- Install Xcode 7.2 or newer (via web download or the Mac App Store).
-
Configure the Xcode command-line tools to use the newly-installed version of Xcode by running
sudo xcode-select --switch /Applications/Xcode.app/Contents/Developerfrom the command line.This is the correct path for most cases, when you want to use the latest version of Xcode. If you need to use a different version, specify that path instead.
- Make sure the Xcode license agreement is signed by either opening Xcode once and confirming or
running
sudo xcodebuild -licensefrom the command line.
With Xcode, you’ll be able to run Flutter apps on an iOS device or on the simulator.
Set up the iOS simulator
To prepare to run and test your Flutter app on the iOS simulator, follow these steps:
- On your Mac, find the Simulator via Spotlight or by using the following command:
$ open -a Simulator- Make sure your simulator is using a 64-bit device (iPhone 5s or later) by checking the settings in the simulator’s Hardware > Device menu.
- Depending on your development machine’s screen size, simulated high-screen-density iOS devices may overflow your screen. Set the device scale under the Window > Scale menu in the simulator.
- Start your app by running
flutter run.
Deploy to iOS devices
To deploy your Flutter app to a physical iOS device, you’ll need some additional tools and an Apple account. You’ll also need to set up physical device deployment in Xcode.
- Install homebrew.
- Open the terminal and run these commands to install the tools for deploying Flutter apps to iOS devices.
$ brew update
$ brew install --HEAD libimobiledevice
$ brew install ideviceinstaller ios-deploy cocoapods
$ pod setup
If any of these commands fails with an error, run brew doctor and follow the instructions
for resolving the issue.
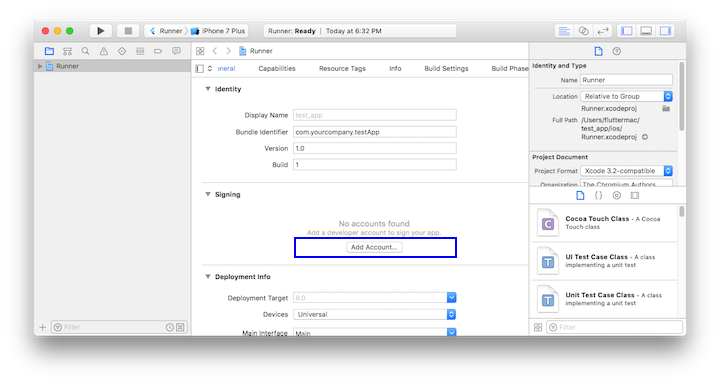
- Follow the Xcode signing flow to provision your project:
- Open the default Xcode workspace in your project by running
open ios/Runner.xcworkspacein a terminal window from your Flutter project directory. - In Xcode, select the
Runnerproject in the left navigation panel. - In the
Runnertarget settings page, make sure your Development Team is selected under General > Signing > Team. When you select a team, Xcode creates and downloads a Development Certificate, registers your device with your account, and creates and downloads a provisioning profile (if needed).- To start your first iOS development project, you may need to sign into Xcode with your Apple ID.
Development and testing is supported for any Apple ID. Enrolling in the Apple Developer Program is required to distribute your app to the App Store. View the differences between Apple membership types. - The first time you use an attached physical device for iOS development, you will need to trust both your Mac and the Development Certificate on that device. Select
Trustin the dialog prompt when first connecting the iOS device to your Mac.
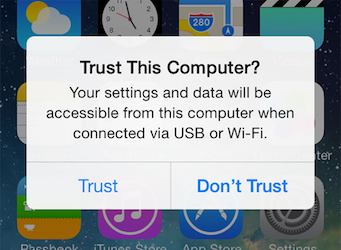
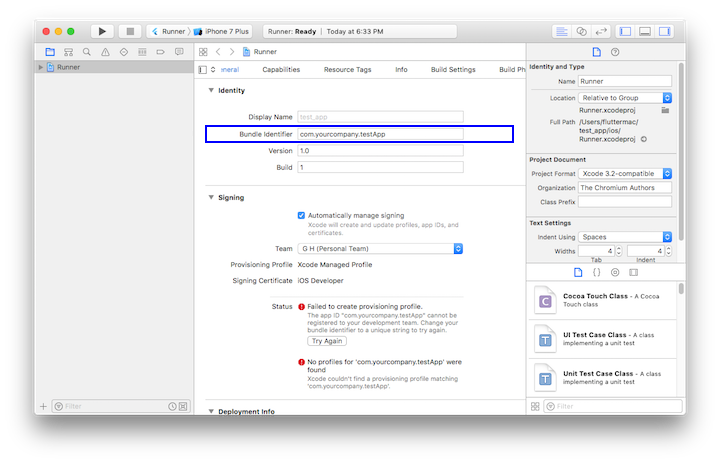
Then, go to the Settings app on the iOS device, select General > Device Management and trust your Certificate. - If automatic signing fails in Xcode, verify that the project’s General > Identity > Bundle Identifier value is unique.
- To start your first iOS development project, you may need to sign into Xcode with your Apple ID.
- Open the default Xcode workspace in your project by running
- Start your app by running
flutter run.
Android setup
Install Android Studio
-
Download and install Android Studio.
-
Start Android Studio, and go through the ‘Android Studio Setup Wizard’. This will install the latest Android SDK, Android SDK Platform-Tools, and Android SDK Build-Tools, which are required by Flutter when developing for Android.
Set up your Android device
To prepare to run and test your Flutter app on an Android device, you’ll need an Android device running Android 4.1 (API level 16) or higher.
- Enable Developer options and USB debugging on your device. Detailed instructions are available in the Android documentation.
- Using a USB cable, plug your phone into your computer. If prompted on your device, authorize your computer to access your device.
- In the terminal, run the
flutter devicescommand to verify that Flutter recognizes your connected Android device. - Start your app by running
flutter run.
By default, Flutter uses the version of the Android SDK where your adb tool is based. If
you want Flutter to use a different installation of the Android SDK, you must set the
ANDROID_HOME environment variable to that installation directory.
Set up the Android emulator
To prepare to run and test your Flutter app on the Android emulator, follow these steps:
- Enable VM acceleration on your machine.
- Launch Android Studio>Tools>Android>AVD Manager and select Create Virtual Device.
- Choose a device definition and select Next.
- Select one or more system images for the Android versions you want to emulate, and select Next. An x86 or x86_64 image is recommended.
- Under Emulated Performance, select Hardware - GLES 2.0 to enable hardware acceleration.
-
Verify the AVD configuration is correct, and select Finish.
For details on the above steps, see Managing AVDs.
- In Android Virtual Device Manager, click Run in the toolbar. The emulator starts up and displays the default canvas for your selected OS version and device.
- Start your app by running
flutter run. The connected device name isAndroid SDK built for <platform>, where platform is the chip family, such as x86.